banner
Get off the cross we need the wood

About Me

Maybe-not-really-20-something-anymore from Norway who likes to scrapbook and take photos documentarystyle and dreams of photojournalism when not working as a photojournalist and that's pretty much what this blog is about. And I like it this way.


My Scrapbooking

Been scrapbooking since late fall 2005. Currently fortunate enough to be a part of the design teams for Hambly Screenprints, Fancy Pants Designs and Pencil-Lines. ♥


2/2

Showing posts with label tutorial. Show all posts

~~ Happy 60th ~~

Posted by Ania On Monday, February 25, 2013 1 lovely comments

60

Made a few boxes for someone turning 60. I suppose I should just have done one big box, but…it sort of looked better like this.

60a

Added lots of Maya Road embellishments to the yellow box…

60b

Love playing with glitter…even though it gets a bit messy…still…can’t let go of using glitter every now and then! And adding clear distress crackled paint to wooden pieces yields a subtle yet lovely effect methinks.

60e

The second box was decorated using papers from ColorConspiracy, stamp from Craft Origine and embellishments from Prima, Crate Paper (that cute brad) and Jenni Bowlin (the tickets).

60c

Every box had room for four of these French macarons (recipe by Banglamarie, in Norwegian. Give it a trry. Makes a few quite yummy macarons :) ). Just ask my coworkers, they seemed to like my Valentines gift this year:

IMG_7173

Nevertheless.

60f

The third box was the simplest one of them all. Simple, but elegant, if I may say so myself. Stamp by Craft Origine, patterned paper by Basic Grey (anyone recall that collection? Like, 2006 or so :) ).

60g

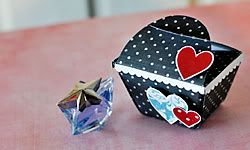
Nevertheless. Give handmade gifts a try. Just make a simple box like this:

IMG_7196

Hmm. Can’t recall the exact measurements I used, but it seems to be like, 5,5x11 inches..the main point is: Trace around your gift(s) and build your box accordingly...

IMG_7197

When you have the basic box, just wrap another piece of cardstock around – then decorate the boxes as you please. Sucky explaination and sucky photos, but still – you get the gist..the idea was just to let you know – this is quite simple really :)


Right! Off to watch Corpse Bride with Amalie…we watched The Nightmare before Christmas last night, and she got so fascinated she wanted to watch “more movies like that” today. So pleased she seem to appreciate Tim Burton on her own! :)


1 lovely comments

~~ Reuse, reuse, re…right…~~

Posted by Ania On Friday, August 31, 2012 2 lovely comments
Box2
Now, I don't know how you do kids birthdays. That is, birthdays of the kids schoolmates and stuff? Around my part of Norway, the parents at the school/class normally try to agree upon a maximum amount when it comes to the value of the kids presents. And as long as the kids are young, they love presents that's stuff. You know, playthings and stuff. But then - to me it seems like there’s a change in preferences when the kids are around nine-ten (or maybe their parents gets more lazier? cough). Anyways,….the kids starts giving each other money instead, or even gift cards.
Although I personally think it's more fun to give toys or similar, I'll also admit that money or gift cards aren't that bad an idea. Especially when my own kids tend to fail to notify us parents in advance that they got a birthday invitation, and three out of four times, only notifies us the same day, giving us mayhaps one or two hours advance before the party starts. Kids!
Wow. That was a long winded explaination! Sorry! Let's move on to todays project – which’s a project for a Maya Road and Epiphanie blog thingie!
Box1
It's a box (duh).
Box4
And inside: Room for a short note (my kids usually don't write much - so the kraft journaling tags from Maya Road are the perfect little size for them :p) and room for money.
Pre1
The box is an old card game box, one that's old and not used any more. But instead of throwing the box away when the game could not be used any more, I figured I'd alter it so it could become a stashed away birthday gift for the occasions of "uhm-say-you-have-had-the-invitation-in-your-bag-all-week-but-decide-to-let-us-know-one-hour-before-the-party-starts" examples :p It's much more fun to arrive with money inside a fun, decorated box instead of money in a plain evnelope, imho (although that has happened too :p). Nevertheless, I covered it w/gesso then wiped around the edges with smoke grey chalk ink.
Pre2
The tag/moneyholder is quite easy to create - just cut a strip that's as wide as the box, but longer - then make folds&creases so it'll fit. I've used a circle punch to punch the folds then slit more room for the journaling tag and the money with a craft knife.
Box3
Cover the box with paper, and decorate the lid. I find the scallop frames chipboard set perfect for this purpose - the shapes are fun and the size is perfect for numbers (I used jonathan mini chipboard numbers here). The fun thing with the Epiphany Crafts epoxy tools is that you can create your very own epoxy shapes, giving "old" paper new uses and looks. Love this star one!
Plus, the scraps are fun to use too - it acts just like a regular paper punch!
Box5
Hope you liked this project! An inexpensive way to make "boring" gifts more fun and seem more thoughtful too *smile*
If you read this in time, there’s a giveaway going on the MR blog! Make sure to go read the details on his post.
Maya Road supplies:
Maya Mist - dark cornflower mist
Jonathan Mini Chipboard numbers
Twine cording - clementine orange
Scallop frames chipboard set
Kraft journaling tags
enjoy!

2 lovely comments

~~ Tutorial: Dear Lizzy, I so love this line! ~~

Posted by Ania On Wednesday, May 30, 2012 5 lovely comments
giftbox
Loook what a gorgeous, feminine line the Neapolitan collection from American Crafts is!
*lovelovelove*
Truth to be told, I’m not always *that* fond of premade embellishments that’s put together in advance sorta (I sort of feel that defeats the purpose of *creating*), but the embellishments in the AC-line? *loves* Hands down!
So when I got the Neapolitan line from AC for the Glue Arts collaboration, I was in awe – such a generous amount of products and so so pretty!
I truly adored what we got to work with from American Crafts, and whipped up three cards in no time! The huge array of premade embellishments makes it so easy for the busy scrapper to put together a card that isn't only fast to create, but actually looks thoughtfully put together! Love that!
(ok, enough giddying….=) )
First: The two regular cards:
ACcard1
One for a colleague turning 40…
accard2
A card for a babygirl (see the bling?? Doodlebug-bling that’s like, 4 years old or more! Go me for trying to use old stuff!)
ACcard2a
Couldn’t help but sneak in these Maya Road-kraft owls! My cousin and her s.o. are both avid birdspotters…working in the field of ornithology :)
Now, this exploding box:
giftbox1
giftbox3
So easy to create! Especially with the premade embellishments from AC!
ac_box1
First: Create your base. I made mine so that I could use 3" squares of patterned paper to create the sides of the box. Score the sides according to the picture if you want the same sized box as mine. Cut out the outer corners so that you get a "cross" for your actual box.
giftbox2
I've seen an increasing popularity in creating such folders for giftcards or money in regular cards, but it wasn't until I saw this idea by Zuzia (LINK:http://blog.thescrapcake.com/2012/05/amazi...-idea-by-zuzia/ or to my pin: http://pinterest.com/pin/71424344060697834/) I realized I should combine these two ideas into this one.
ac_box2
To do so, start with a sheet of patterned paper in the same pattern as the inner pages. If you're following my measurements, these are the measurements for this one (see picture).
ac_box3
Fold…
ac_box4
..and cut w/a circle puncher. (Thanks for borrowing me this one, Eli! =) )
ac_box5
And as for the box topper, just cut a square and score as following in the picture.
Snip/cut in the sides, fold and adhere so you get a little box.
giftbox4

Hurry over to the Glue Arts blog, you can enter to win a AC-goodiepack (if it’s like the one we got you’re totally in for a treat!) and some adhesive-goodies :) And not to mention – even more inspiration from the other gals :)

5 lovely comments

~~ Tutorial: Pretty pot of roses! ~~

Posted by Ania On Wednesday, May 02, 2012 2 lovely comments

ania_flower4

There’s no denying. Prima makes the most gorgeous flowers out there. And with a ball of styrofoam, a stick of wood (the kind you use for BBQ and stuff), a little oasis (the green thingie you stick flowers into…what’s it called in English….oasis too?), a small pot and hot glue gun….you’ll whip up such a project in no time. And no, it’s not difficult at all….even I managed to create one :)

ania_flower1

Start with the pot: paint it white, add glitter to the top border and let dry. Adhere ribbon around the edge.

ania_flower3

Stick the wooden stick to the ball, secure with some adhesive. Cut the stems of the paper-roses, keep a small snippet of the stem so it can be used to pin it into the ball. Then just dab hot glue to the bottom of the flower and stick them to the styrofoam. Keep the flowers tight.

ania_flower

Cut the oasis so it’ll fit the pot, poke a hole in the middle for the stick by premaking a hole, dab some hot glue into it before sticking the stick to it (I’m so eloquent today!)..finish by adding more flowers to make up the “ground” and tie some ribbons underneath the ball.


For more, pretty flowerinspiration..check out this Prima-post :) Or this one. Or this. Or this!


2 lovely comments

~~ Tutorial: Photo-a-day-journal ~~

Posted by Ania On Tuesday, March 13, 2012 6 lovely comments

bok1

Oy. You know the hype w/the photo-a-day-challenges? Well, I figured I’d make my own (or well, this one is for a young relative of mine), mixing up some of the prompts I’ve seen floating around the web for this journal premade outta scraps (mostly Pink Paislee & Hambly Screenprints), embellishments from Sassafras, Prima, Craft Origine and Maya Road and least but not last; Vintage Mix & Match numbers from Elle’s Studio :) Oh, and bakers twine from The Twinery (there’s a discount over there atm – 15% off if you use ILOVETWINE this week. I’m not affiliated, just love their twine & plan to order some once I get this months pay..somehow the money keeps..like…disappearing :p) Oh, and if you hurry over to Glue Arts right now you can enter their giveaways :) Here’s my post with them, this week’s theme is children & teen craft ideas :)

bok2

Nevertheless. Think & whimsical & nifty. I hope.

bok4

Here’s the list of the challenged issued, in Norwegian. Found an old Rhonna Farrer digiswirlthingie to prettify the list.

bok_tut1

First - gather various scraps which'll match somewhat.

Doesn't matter that they won't be the same size - it's just cool.

bok_tut3

Fold them together w/a bonefolder - you don't even need to make sure they are folded in the middle - one page can just as well be longer than the other. Use the border punch or the corner punch on some of the pages.

bok_tut2

Carefully sew in the middle of the pages (or punch holes & thread some twine to hold the pages together).

bok_tut4

Some of the Elle’s Studio number-tags were fairly large, so I just added adhesive to the corner edges so that my niece will be able to lift the tags some to tuck her images in behind the number-tags. For some of the smaller number tags I just used the extreme adhesive squares - either large or small ones depending on the size of the tags.

bok3

Oh, and the closing thingie: the twine wrapping around the book a couple of times? Saw this idea somewhere in the blogosphere, I’m so sucky at remembering from where. Just recall I thought that was such a simple yet cool idea and that I needed to try it out sometime. Well, from what I can tell it looks to be working swell!

bok5

Love the number-tags from Elle’s!

bok6

There ya go.

Now, I have a buncha projects which I need to get started with. If only the kiddo wasn’t so into Doctor Who these days so I had some more time to play w/paper in the evenings! (Oh, who am I kidding. LOVE Doctor Who, which reminds me of my childhood and early mornings with Sky Channel and Pat Sharp and, as far as I have gathered, the fifth Doctor, and LOVE that the kids loves him too! :D)


6 lovely comments

~~ Tutorial: Love tag ~~

Posted by Ania On Sunday, February 12, 2012 2 lovely comments

ania_tag

I love challenges. I truly do.
But sometimes the challenges are ridiculous. Like the Maya Road one where we were only allowed to use seven – 7 – various MR products. Yes. Seven only.
Initially you may think: Oh, seven products. To create one tag? Easy peasy, that’s almost a bit too many products. I know I did when the challenge was presented to us. I mean, you’re supposed to do just a little tag, no? But do not be fooled. It’s such a limitation and I had to be tough and drop a LOT of stuff. No fair! SIGH!

This is what I did:

preselection

I gathered a number of MR-products I thought would fit this challenge. We could use a few freebies, like ONE sheet of patterned paper (only one though!), staples, punches – basic tools mostly and hardly any extra product.

finalselection

After much back and forth & lots of pain and stuff I ended up with these items:

Popsicle Blue Maya Mist
Butterfly Canvas Set
Scallop Frames Chipboard Set
Love Words Mini Chipboard Set
Kraft Shipping Tags
Timeless Memories Stamp
Just My Type Stamp Sheet

Additionally I used a sheet of paper from Crate Paper, Mod Podge, white and turquoise embossing powder, tulle, staples and white gesso. I *so* wanted to use at least two or three more products, but sigh. A challenge is a challenge I guess!

ania_tut1

I so love this technique after seeing Ronda Palazzari demonstrate it for uh, CK or something like that a while ago. Currently I’m using archival ink – jet black – it’s moist enough for this purpose. StazOn, which’s my to-go-permanent-stamp-pad, doesn’t work well for this purpose…at least not the pads I have, maybe it’s too old (like, dried too much??) Dunno. Nevertheless. I’m impressed w/how precise and fine prints you can get even on a surface like canvas. Then again. I’m easily impressed =) Right.

ania_tut2

The kids found this Tim Holtz hammer the other day. “Mom, that’s a weird-looking hammer”. Figured I should use it,haven’t used it too much since I bought it. Typical. Not sure why I bought it in the first place either, but hey. Yields fun textures when you remember you have such a tool =).

ania_tut3

Right. Dilute the mist w/ a little bit of water and paint the color on stuff. Vary the intensity of the color w/mist & water.

ania_tut4

Staple the tulle to the embossed tag, attach stuff, curse that you can’t use more than 7 MR products ‘cause a pin or a ribbon would be awesome to add to the butterfly…

ania_tut5

Then figure out an alternative way to have something in the middle of the butterfly..like cutting a triangle of paper,

ania_tut6

…add mod podge and roll it into a paper bead and let dry…

ania_tut7

Before attaching it to the tag. Once again; a pin would be perfect to have inside the paper bead, sticking out from it, but ahwell. Consider the challenge met!


Right! you should check out how the other designers solved this challenge…the Maya Road Challenge PDF can be found here….they’re also giving away a prize pack, just scroll all the way down the PDF to learn how to enter…


Ps! It’s Mothers Day in Norway today. Happy Mothers Day!


2 lovely comments
    -Get off the cross we need the wood-