


You *must* have a look at their wedding pages, what these gals have done w/this theme is simply amazing…I envy their abilities to shoot their projects in like, perfect surroundings and all, and really go for the whole scene & feel and stuff. Nevertheless..
I’m gonna share how I folded these small yet very sturdy boxes here – they can be used for pretty much everything…create two (with one slightly smaller than the other), and you’ll have a box w/a lid…
To create the box, you need a square. 7x7” yields a 2,6” box, 8x8” yields a 2,8” box.

Fold the square both ways – first one side, then reopen before folding the other side. Use a bonefolder to get crisp folds.

Now you need to fold it diagonally. First one side, then reopen before folding it the other way.

Now, open the paper. Fold all the corners into the middle/center, like pictured. (Do the last one not done in the image too)

Letting the folds stay, fold the edge towards the middle. Do the same with the opposide edge. Burnish with the bonefolder.

Now, open the edges you just folded into the middle all the way out. Let the ends stay flat.

Fold the two other edges towards the middle.


Now, open the two last folds upwards and grab the corners as shown in the picture..

Wrap the flaps over like in the image, tuck and create a little box..

Congratulations, you now have a little box! Feel free to add a square of doublesided tape/adhesive to the bottom of the flaps so they will stay put.

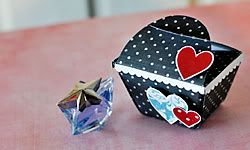
For every one of these boxes I created them an individual tag reflecting the style of the box’s patterned paper, using lots of scraps (lots of scraps is good! Always makes me happy when I actually use even the tiniest bit!). Lovelove the Hambly Screenprints-transparencies used on two of the tags…sigh…the sheets are soon used up (the cream ones)…nrgh! They’ve lasted me a long time though, and I’ll definitely buy them when I see them again!

I’ve used bits and pieces of both newer and older Crate-collections, and placed the boxes upon sheets of tulle, wrapped them up and tied them w/bakers twine. Some flowers from Prima snuck in on this one as well.

Thanks for looking, and don’t miss the rest of the wedding fun over at Crate Paper – lasting all week long!

There’s even challenges going on, just check out this post (and I believe it looks like more are coming).


Love this! Can't wait to try it out!