

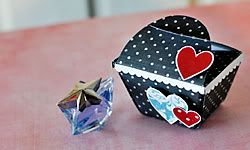

This is a box I made a few weeks ago, I think it was in the beginning of the Summer or something like that. Mom was visiting and needed a little hostess gift for a friend who invited her on dinner..

So I made this little box, which I’ve created a few times, and even done a tutorial on for the Norwegian challenge blog That’s Just So Cute back in July. Figured I’d share the tutorial here too, in English..hm? (the Norwegian version can be found here). Scroll down…

See…it holds such candies so well…I think it’s a nice treat and it’s pretty quick whipping up aswell – I only had half an hour creating and photographing this one before mom was off for that dinner of hers...all materials: Prima Marketing for the box above, and lots of Crate Paper for the box in the tutorial.
Right, the tutorial. First you have to find a small, open box, or create your own (see tutorial on how to fold the box itself here).

Find a thicker cardstock/cardboard for the top/bottom. I usually ask the LSS whenever I’m dropping by if they have any pieces they don’t mind giving me – they normally get such when they receive their papers. Place your box upon, and cut out two squares larger than your box.

Like this – one for the bottom and one for the top!

Dress up the bottom/tops..

Now, for the flap at top, cut out a strip of cardstock slightly wider than your box, and adhere it to the bottom between the bottom/box, fold/score, adhere to the back of the box..leave the top for now, we’ll decorate it first before attaching it to the flap..

Right! Decorate the top!

Then adhere it to the flap..feel free to add like, ribbon or something like that so it’ll be easier opening the box..(I know, I’m so wonderful at explaining…but the truth is, I usually just wing these kinda things so maybe it’s why I find it hard to put it into words, hmm! Nevertheless, I hope you got an idea of how to do these boxes..it’s just to get started then it’s pretty self-evident what to do sorta :) )


I think this is absolutely gorgeous!! I bet the recipient loved it!
A+mazing... I love the vintage look. I could see my mom loving this for her victorian rooms.. beautiful job...